Choosing a web server is a technical thing. You need a sound knowledge of how web servers work before making the right choice. Openlitespeed is yet another web server that performs out of the box. People choose Openlitespeed over other web servers because of the quick response time, fast performance, and Gui-based user-friendly setup. In this tutorial, we will see how to install Openlitespeed on Rocky or Alma Linux.

While most bloggers choose OpenLiteSpeed because it performs out of the box, many choose Nginx over OpenLitespeed as Nginx is matured, highly stable, well adopted, and delivers performance equivalent to OpenLiteSpeed.
Prerequisites
- Rocky or Alma Linux installed VPS with the initial setup. You can follow our initial Rocky or Alma Linux server setup guide.
Setting up the server to install Openlitespeed
We cannot install Openlitespeed directly as we have certain things to set before that follow the steps below for the same
Install wget
To download anything we need to have wget installed
# sudo dnf install wget -yInstall Litespeed repository
By default, RHEL-based operating systems don’t have a Litespeed repository installed. So we have to do it on our own.
# sudo wget -O - https://repo.litespeed.sh | sudo bashYou should get the following output
--2023-04-18 16:47:24--  https://repo.litespeed.sh/
Resolving repo.litespeed.sh (repo.litespeed.sh)... 34.192.49.9
Connecting to repo.litespeed.sh (repo.litespeed.sh)|34.192.49.9|:443... connected.
HTTP request sent, awaiting response... 200 OK
Length: 4739 (4.6K) [application/octet-stream]
Saving to: ‘STDOUT’

-                   100%[===================>]   4.63K  --.-KB/s    in 0.04s

2023-04-18 16:47:27 (132 KB/s) - written to stdout [4739/4739]

/tmp ~
  % Total    % Received % Xferd  Average Speed   Time    Time     Time  Current
                                 Dload  Upload   Total   Spent    Left  Speed
100  1798  100  1798    0     0   1542      0  0:00:01  0:00:01 --:--:--  1540
~
LiteSpeed repository has been setup!
Install EPEL and REMI repositories
Next, we have to install EPEL and REMI repositories so we can install OpenLiteSpeed along with the required lsphp version
# sudo dnf install -y epel-release
# sudo dnf install -y https://rpms.remirepo.net/enterprise/remi-release-9.rpm
Now let’s build the repositories
# sudo dnf makecacheYou should get the following output
Extra Packages for Enterprise Linux 9 - x86_64  7.5 kB/s | 6.0 kB     00:00
LiteSpeed Tech Repository for CentOS 9 - x86_64 7.7 kB/s | 3.6 kB     00:00
LiteSpeed Tech Update Repository for CentOS 9 - 7.9 kB/s | 3.6 kB     00:00
Remi's Modular repository for Enterprise Linux  636  B/s | 833  B     00:01
Remi's Modular repository for Enterprise Linux  3.0 MB/s | 3.1 kB     00:00
Importing GPG key 0x478F8947:
 Userid     : "Remi's RPM repository (https://rpms.remirepo.net/) <remi@remirepo.net>"
 Fingerprint: B1AB F71E 14C9 D748 97E1 98A8 B195 27F1 478F 8947
 From       : /etc/pki/rpm-gpg/RPM-GPG-KEY-remi.el9
Is this ok [y/N]: y
Remi's Modular repository for Enterprise Linux  426 kB/s | 882 kB     00:02
Safe Remi's RPM repository for Enterprise Linux 834  B/s | 833  B     00:00
Safe Remi's RPM repository for Enterprise Linux 3.0 MB/s | 3.1 kB     00:00
Importing GPG key 0x478F8947:
 Userid     : "Remi's RPM repository (https://rpms.remirepo.net/) <remi@remirepo.net>"
 Fingerprint: B1AB F71E 14C9 D748 97E1 98A8 B195 27F1 478F 8947
 From       : /etc/pki/rpm-gpg/RPM-GPG-KEY-remi.el9
Is this ok [y/N]: y
Safe Remi's RPM repository for Enterprise Linux 492 kB/s | 910 kB     00:01
Rocky Linux 9 - BaseOS                          1.3 kB/s | 4.1 kB     00:03
Rocky Linux 9 - AppStream                       1.2 kB/s | 4.5 kB     00:03
Rocky Linux 9 - Extras                          1.2 kB/s | 2.9 kB     00:02
Metadata cache created.
How to install OpenLiteSpeed and lsphp
Now, that we have everything ready, let’s install Openlitespeed.
# sudo dnf install openlitespeed lsphp81 -ySince lsphp74 is already installed with Openlitespeed, we will install lsphp81.
# sudo dnf install -y lsphp81-common lsphp81-mysqlnd lsphp81-imagick lsphp81-intl lsphp81-process lsphp81-mbstring lsphp81-xml lsphp81-pdo lsphp81-imap lsphp81-soap lsphp81-bcmath -yWith this, we have successfully installed Openlitespeed.
Configure Openlitespeed admin credentials
Now let’s configure admin access so that we can access Openlitespeed admin portal with our configured credentials
# sudo /usr/local/lsws/admin/misc/admpass.shYou will be asked to enter the login ID and password, process it as per your wish, and restart Openlitespeed
# sudo systemctl restart lswsConfiguring Firewall
Let’s configure the firewall to allow ports 8088 and 7080 because Openlitespeed works on these ports.
# sudo firewall-cmd --permanent --add-port={8088,7080}/tcp
success
# sudo firewall-cmd --reload
success
Now go to your browser and enter your IP with 8088 (http://yourip:8088) to check the Openlitespeed page.
Now you can log in to your web admin page by entering your IP with 7080 (http://yourip:7080) on your browser.
Configure SSL on Openlitespeed
To configure SSL in Openlitespeed let’s first install Certbot
# sudo dnf install certbot -yRequesting certificate from LetsEncrypt
# sudo certbot certonly- Enter 2 when it asks to save certificates in the web root directory
- Enter your email ID when asked
- Agree to the terms and conditions
- Enter domain name when asked (Note: use both yourdomain.com www.yourdomain.com)
- In “Input the webroot for YOUR_DOMAIN: (Enter ‘c’ to cancel):”
Copy and paste /usr/local/lsws/Example/html
Note: Change “yourdomain” to your original domain.
Setting up auto-renew
# sudo crontab -eCopy and paste the code below
0 0,12 * * * root python3 -c 'import random; import time; time.sleep(random.random() * 3600)' && /usr/local/bin/certbot renew -q --deploy-hook 'systemctl restart lsws'Press “shift+:”, then type “wq” and press enter to save the file.
Configuring SSL in Openlitespeed Web admin
To configure SSL for your Webadmin. Login to http://yourdomain:7080
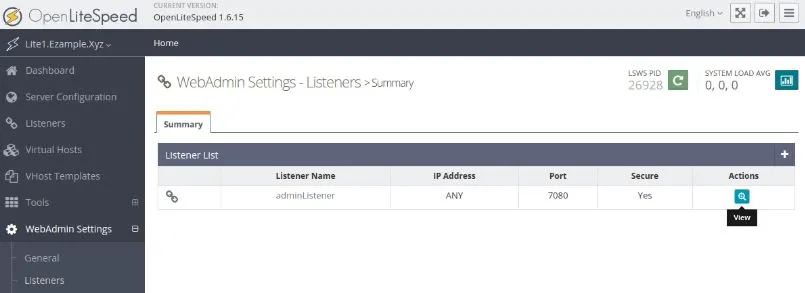
Click on “Webadmin Settings” then click “Listeners”
Click on “View” under “Actions”

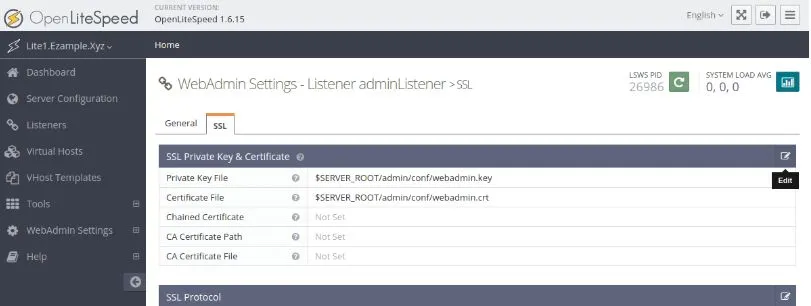
Click on “SSL” tab, then click on “Edit”

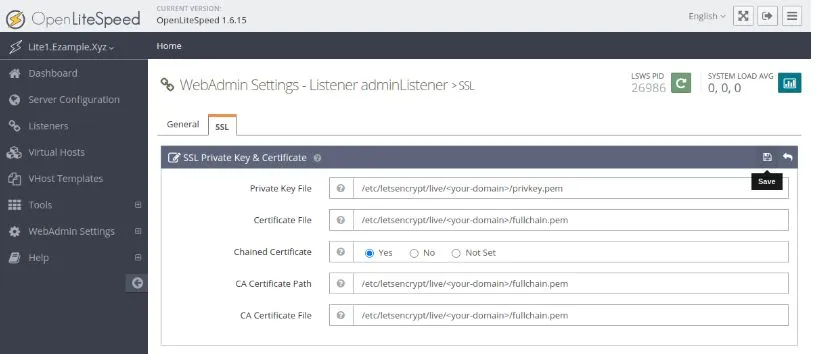
Enter the following in the fields Private Key File: /etc/letsencrypt/live/yourdomain/privkey.pem
Certificate File: /etc/letsencrypt/live/yourdomain/fullchain.pem
Chained Certificate: Yes
CA Certificate Path: /etc/letsencrypt/live/yourdomain/fullchain.pem
CA Certificate File: /etc/letsencrypt/live/yourdomain/fullchain.pem

Click on the “Save” icon
Click on the “green restart icon” for a graceful restart.
Note:- change “yourdomain” with your original domain.
Now reopen the admin login page by going to https://yourdomain:7080 to confirm.
Leave a Reply